The last post provided an overview of Project Roadmaps and why they are a very useful tool. This post is going to provide an easy to follow guide on how to create a project roadmap.
Roadmap Tool / Software
While there are many good tools for creating project roadmaps, the good news is that it is possible to create a simple yet powerful roadmap with the tools most people have on their computers. The majority of roadmaps are created using:
- PowerPoint
- Word
- Excel
- Visio
(or any packages similar to those listed above).
Objective
Before you start typing and inserting data, you must be clear on the objective of your project roadmap:
- Target audience
- Message being delivered and / or question be answered
- Timeline
- Scope (individual project, programme or portfolio)
- Any other stated request?
Understanding this before you start is very important as without knowing the required outcome, you could spend a lot of time creating a visually pleasing roadmap that does not help the target audience. To be more blunt, it is a waste of everyone’s time.
Important: Resist the urge to fire up PowerPoint without knowing your objective.
Identify Important Data
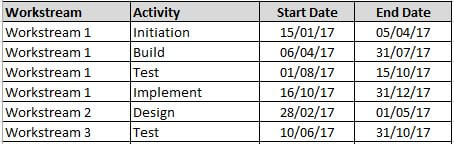
Based on the objective, you need to identify what are the important data points that will need to be displayed. This can be achieved by reviewing the project charter and / or project schedule.
Identify the core activities that are significant and capture the start and end dates. If there is a lot of items you may want to record in a simple list.
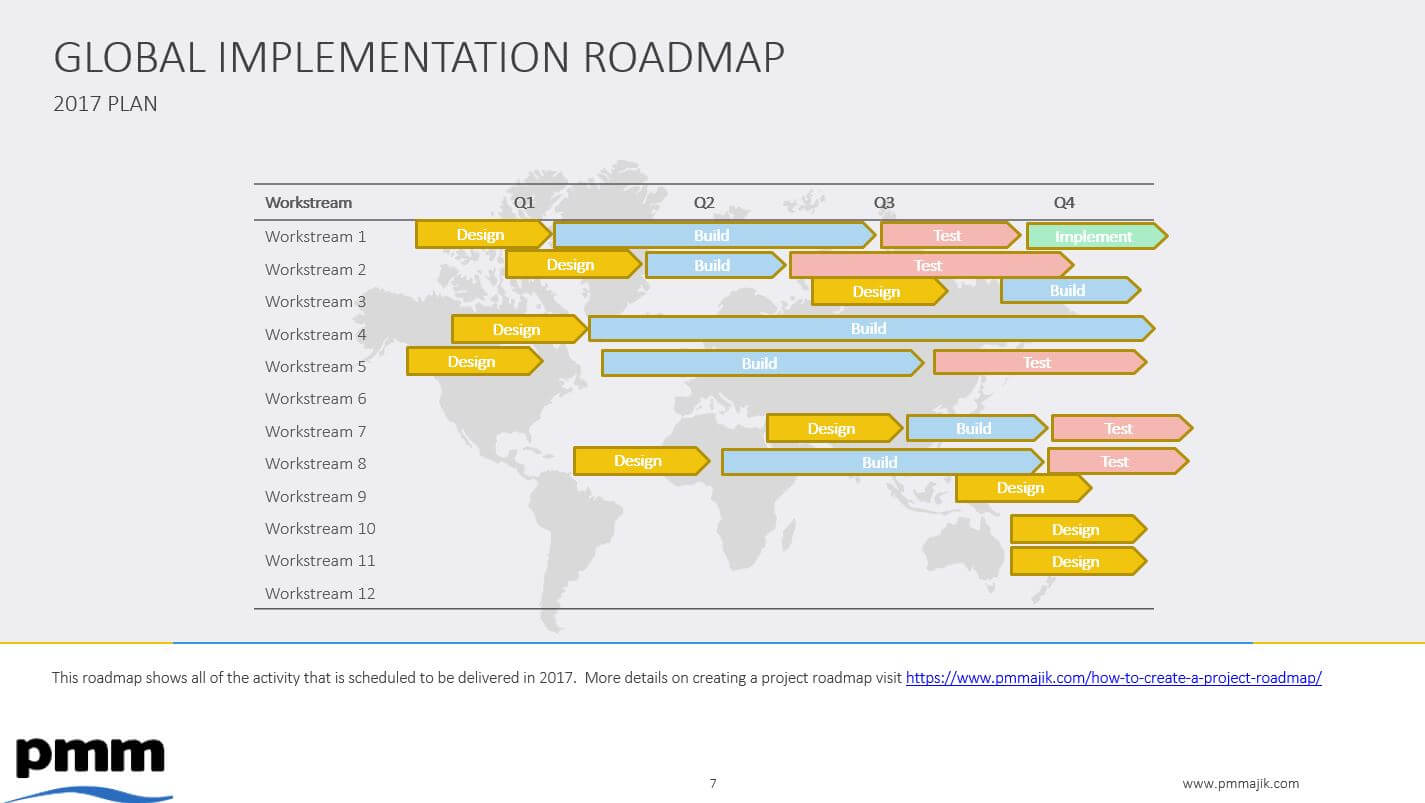
If the roadmap is going to contain multiple workstreams, make sure you capture the workstream as well as the activity.
When you have finished the exercise you should have a good idea of the items that you will include on the roadmap.
Establish Timeline
After capturing the important data, you should have an idea of the timeline that your roadmap will need to show. This is simply the earliest start date of any of the activities and the latest date of any of the activities.
Depending on the duration between the start and end will help decide the intervals on the timeline. For example a 4 week timeline may be in weekly units where as a year may be monthly or even quarterly intervals. The timeline should be set so that all the information can be shown clearly on a single page.
Roadmap Mock-up
You now should have all of the information that you need to create the roadmap. The next decision is how you will visually present the information.
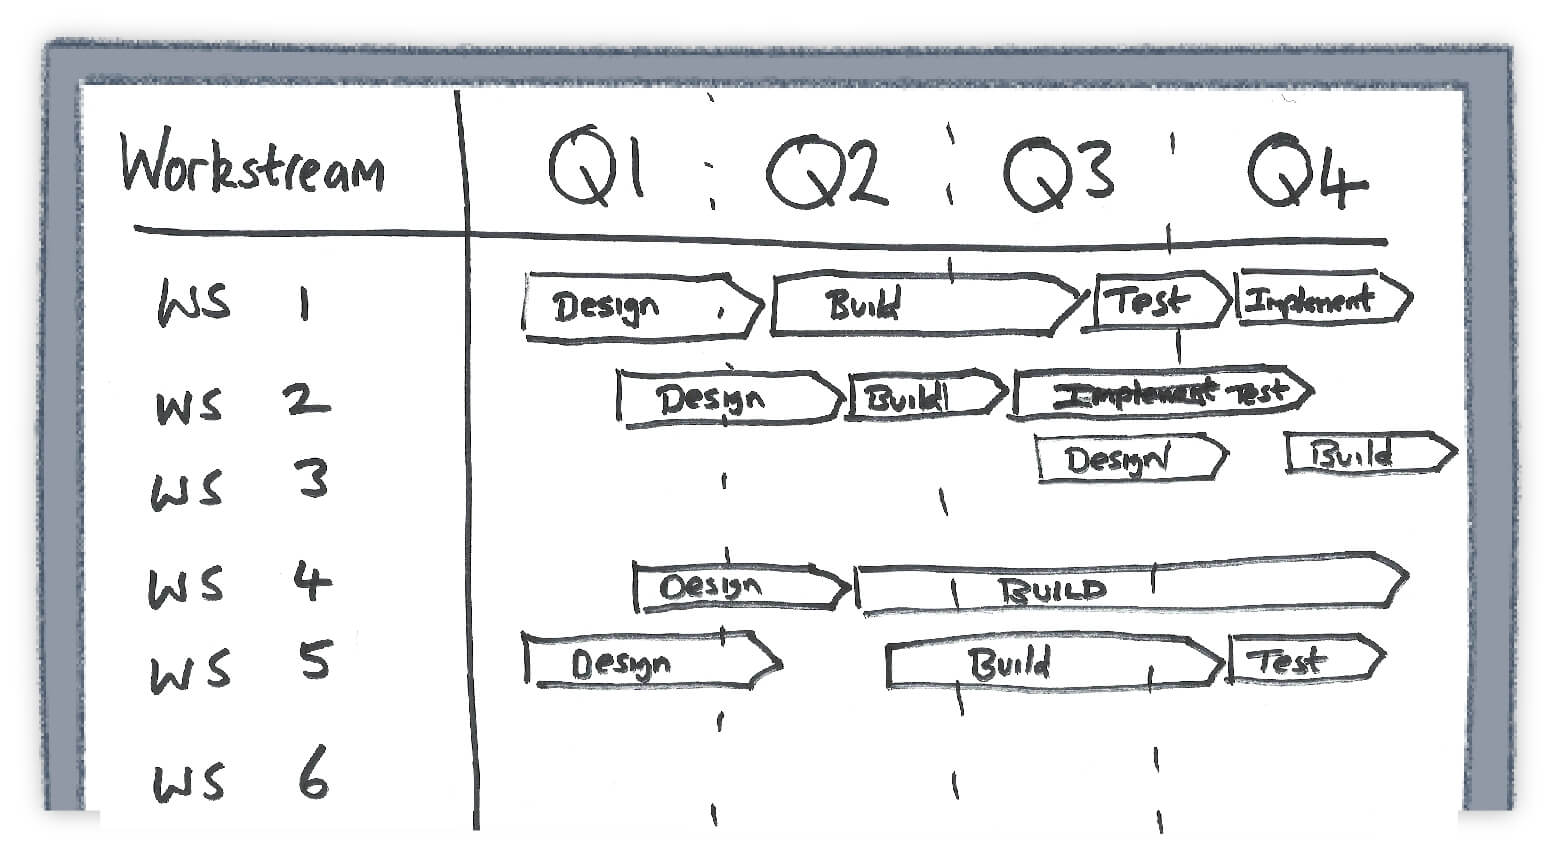
It can be very useful and efficient to invest time creating a mock-up. All you need is pencil and paper.
Start by laying out the timeline at the top of the page. This you will have established from the earliest and latest dates.
If you are going to show multiple workstreams or activity streams, these should be listed down the left side of the page.
You then can add each of the activities onto the main part of the roadmap by plotting each activity against the timeline and workstream.
This will give you a rough idea of what the roadmap will look like.
Initial Review
Before committing the design to electronic format, it is a good idea to review the mock-up to:
- Ensure all items are captured
- Does it meet the objectives
- Is the design clear
- Is the design visually appealing
- Are there items missing
It is far easier to correct gaps at this stage then after you have created the electronic version.
Create Roadmap
With a good mock-up you now can create the electronic version using the tool of choice. As you have already done the hard work in creating the mock-up, this should be a relatively easy step.
As you create the roadmap you will need to consider design aesthetics such as colour, shading, bar design, use of graphics, font, etc. The aim is to create a design that is professional BUT does not distract the user from the message or data.
This may be relatively simple as your organisation may have set guidelines for the colours and fonts to use. In this case follow the guidelines as this then reduces the chance for stakholders to request design changes.
Sponsor Review
When you have created the project roadmap and completed final checks to ensure it is create, you should review with the sponsor (or person requesting the roadmap). This should identify any final adjustments.
When these changes have been made you should have an accurate roadmap.
Ongoing Updates
The roadmap is a living document. Therefore, you should ensure that it is updated on a periodic basis inline with schedule updates.
Summary
The project roadmap can be quickly and easily created by following the steps below:
- Select roadmap tool
- Objective
- Identify important data
- Establish timeline
- Create roadmap mock-up
- Initial review
- Create roadmap
- Sponsor review
- Ongoing updates
A copy of the Project Roadmap template has been added to the Xtra Bonus Templates section of the PM Majik Member’s Area.